0.00 грн.
CheckoutHow to assemble a growbox

Grow box is a must-have for the grower. This is a design that creates optimal conditions for growing magic mushrooms and crops in a short period of time.
What do you need to assemble a grow box? And what nuances should be taken into account in the first place?
Step 1: Preparing the Room
Before you assemble the grow box, you need to choose the room where it will be installed - a garage, a basement, a separate room in the apartment. And after that, you need to conduct a small audit in the room.
Recommended to check:
- electrical wiring status;
- temperature regime: temperature fluctuations are unacceptable in the room;
- humidity level: it should be moderate;
- cleanliness in the room: it should be free of mold, black spots and other foci for the development of bacteria.
This is all you need for a grow box, and what you should take care of in advance.
Step 2: Choose or Assemble a Grow box
You always have a choice: buy a growbox or build it yourself. The criteria for choosing materials for a finished product or a homemade one are the same:
- non-toxic material for the "base" (case);
- application of water-based paint on reflective surfaces made of foil, penofol or films (applied in 3-4 layers);
- the presence of air holes, a fan and mounting sleeves;
- installation of the tray and belts for hanging the filters.
As you can see, the grow box scheme is simple, but there are some nuances that you need to pay attention to.
Step 3: Assembly
For assembly, you will need certain accessories for the grow box:
- base - cabinet or awning, consisting of 8 supports and 6 faces. It is made of wood, plywood, chipboard. You can connect the edges with glue or fasteners. There should be no gaps or cracks between the edges. The case must be completely sealed;
- the base should have holes for wires;
- plastic sheet: it is placed on the walls of the box;
- foil or other reflective materials: these are fixed over a plastic sheet to enhance the effect of the lamps.
Now you know how to assemble a grow box, and you are ready to get a rich harvest.
Step 4: ventilation
The grow box is ready. Now we need to think about the ventilation system. There are two options:
- ventilation holes in the top of the tent: hot and polluted air will be neutralized through them;
- fan: installed at the bottom of the box to “raise” and immediately eliminate unpleasant odors and harmful impurities.
A charcoal filter is used as an optional component to purify the air. It eliminates unpleasant odors, retains particles of dust, pollen, mold.
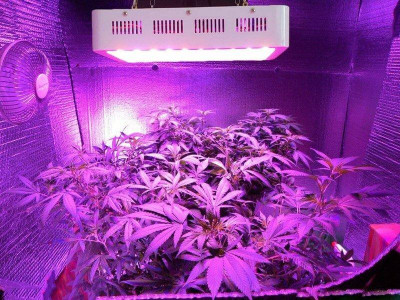
Step 5: Lighting
For growing special crops, HPS, LED and energy-saving lamps are suitable. The power of the lamp depends on the area of the box: the larger it is, the more powerful the light source should be.
The lamps are installed at a distance of 15-20 cm from the top of the plants to ensure the optimal flow of photosynthesis and other processes that affect the development of plants.
Step 6: Additional Equipment
To make the growing process, you can install additional devices and equipment:
- thermometer to control the temperature level in the box and respond in time to temperature fluctuations;
- hygrometer: used to check the humidity level;
- humidifier or dehumidifier to provide a comfortable environment for plant growth and development;
- Drip irrigation system for timely watering of plants according to the selected schedule.
All these devices will facilitate the care of crops, and make the process of growing them a pleasure.
Comments:0
Reviews:
Related articles
9 reasons to become a grower
If you love everything natural and love to grow something, then it's time to learn how to become a grower not in dreams, but in practice. They say that the craving for the earth appears with age, but often only the lack of free time and the lack of a..
What are feminized seeds and what are they for?
If you are just trying on the image of a professional grower or want to expand your horizons with information about growing plants at home, you are probably wondering what feminized seeds are and why there is such a hype around them. The online store..
Lighting for marijuana: important tips
In nature, hemp goes through the vegetative stage in natural light. In order to achieve a rich indoor cannabis harvest, it is important to mimic sunlight as closely as possible. It is not enough just to buy powerful lamps. It is significant to use th..

Humidity in the grow box: the optimal temperature for growing cannabis
How to harvest a rich cannabis crop with sticky and powerful buds? Experienced growers have long known the answer to this question - carefully monitor the humidity level in the grow box. It depends on how plants are resistant to mold and parasites...

Noise isolation of the growbox: how to deal with noise in the growbox
Experienced growers know that the noise coming from the grow box is annoying. Especially monotonous. Especially, exceeding 50-60 dB. Therefore, we decided to find out what factors provoke noise, and how to improve the noise isolation of the grow box ..

How to eliminate the smell: proper ventilation in the grow box
There is a lot of advice on the web for beginner growers. One of them is to ensure proper ventilation in the grow box. How to do this and most importantly - why, we will analyze below...
Recommendations for choosing a growbox
If you have decided to get a small garden or terrarium, then you may be wondering if a grow box is the best option for you. Not everyone has the ability to grow rare species outdoors, so a grow box can be a great option for beginner gardeners because..
Hemp in winter: the secrets of yield in unusual conditions
Not all growers have the opportunity to grow plants in full-fledged, spacious greenhouses. Garages, balconies, roofs, attics, any other premises that can be adapted to small green spaces are quite suitable for capture. But in such places, the tempera..